
I find it quite ironic that I'm fairly decent at making Italian food, but really unskilled at making Guyanese food. I would even go so far as saying it's truly more difficult to cook Guyanese food than it is to cook Italian. In case you're unaware, I am Guyanese, hence the irony. And, as a brief geographical lesson, Guyana is located in the northern part of South America - to the right of Venezuela.
Nonetheless I am happy to say that this session of Guyanese cooking was an unusual success, especially when compared with my previous attempt at chicken curry, which turned out quite burnt. The secret to my newfound success is twofold. First, I tried cooking with a stainless steel saucepan last time and on the big burner at medium heat. Ok perhaps there are actually 4 reasons why the last attempt was a failure. ^^; And "second" -- THIS time I called my mom and sought advice from the expert. =D
As a result, while all blogs are about sharing the cooking experience, this particular blog serves two extra purposes. The most important one (for me) is that it will be here as a detailed reminder for me on future attempts because while I have written down instructions several times, I'm hoping this picture blog will work out even better. The other purpose is for my mom to see for herself what I did and offer further recommendations for anything that wasn't done quite right. So, enough with the chatter - let us begin! ^_^
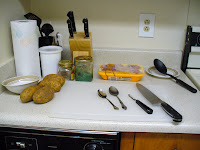
You would think I was making money off all these product plugs, but alas.. lol Okay let's begin with the explanation of what is being presented here. Going counterclockwise from the top right corner of the top left image: A stirring spoon with a dessert plate to capture the mess, the packet of chicken which you can see in greater detail in other picture. Before you freak out, that bottle of green stuff is not a jar full of fungus or mold or anything. =P A couple of months ago when I still had a working blender, I blended together some garlic and onion (possibly some herbs, too). I haven't looked up the science of it, but something about the acids in the mix cause it to turn green, but it is still perfectly good and delicious. Further, the blend of the flavors really enhances the curry flavor - moreso than doing a fresh blend, in my opinion. And yes I realize I messed up my series following the colon but y'know what? I'm not going for a freaking dissertation in English here - this is a colloquial blog about cooking and other crap so get over it. lmao
Ok so the little jar contains a home done blend of "garam masala" or simply masala for short. I believe it consists mostly of Cumin, Anise seeds, and I don't know what else. It's ground together or something. This blend was made by I believe the mother of my dad's cousin - or I think it's my Grandfather's sister? Or sister-in-law? I can't remember exactly. :( The batch was actually given to my mom, who in turn shared some with me. For everyone else, I just googled and found a recipe to make your own blend:
[6/17/11 Edit: I would ditch the cloves and cinnamon and add anise seeds to capture the flavor that was used in this curry.]
Next, you have the tall white container. In that, I keep my share of my mom's curry powder. Now you may feel like you can just go to the grocery store and get their curry powder that they keep in the spice section. And that may even be okay to use. But, I doubt it. I've had a bottle of "cumin powder" in the past and it's much weaker (less potent) than if you were to for example get the seeds. But I guess that's to be expected. However, I didn't expect the difference in potency to be as drastic as what it is. This is the curry powder my mom uses, and I truly believe it makes the difference:
[6/17/11 Edit:
I noticed the link above doesn't link directly to the curry powder anymore. What you're looking for is Lalah's Madras Curry Powder. You can google search it, or take that information to your local grocery store that offers to get specific items upon request (places like Publix/Kroger do it).]
I looked around and they actually have a small box that costs less than $5.00. You can probably purchase your masala from the same place, too. I would also like to take this moment to clarify that the method and ingredients portrayed in this blog is likely to be significantly different from "authentic" Indian curry. This is "West-Indian" cooking, which I presume is vastly different. I guess the Indians in Guyana (and surrounding countries) brought their traditional meals with them, but incorporated the Jamaican ingredients and thus we have a different product with the same name. But I haven't been to India to taste their stuff or watch them cook to really know for sure. All I know is these two things: 1) When I last ate at an Indian restaurant, it definitely tasted different than our stuff. and 2) I tried buying curry powder and garam masala from the local Indian store (not West Indian) and it was very different. I think they add like cloves -- yeah just checked that recipe I linked for masala earlier, and it has cloves and cinnamon. I would say if you're going to make your own, ditch the cloves and cinnamon and add anise seeds. That should give you a blend similar to what I used here. I of course have no idea if that's true though as I have never made my own masala and I did not even witness the making of the masala that I used. I'm going purely off smell here. :)
Okay back to listing the necessary tools. The little container for my large utensils and paper towel roll are not part of it. lol Ok so the bowl, as you will see later, is used to mix the spices and things together. I used 4 potatoes for this curry because I wanted it to last 4 days for 2 people. In reality, one of the pieces of potato got smushed in with the curry (ooo more technical terms! the secret society of cooking secrets and use of confidential technical terms is gonna get me now for sure :P) so that the proportions didn't end up the way I planned. Also, I think I served us more than 1/4 of the curry on the first day so I doubt this is really going to last us 4 days. Oh well.. lol
Nice, big cutting board to cut up your potato and chicken. On that I have displayed a little dessert spoon, a regular eating spoon, a vegetable peeler and my fancy Chef's Knife from the knife set my Grandmother had given me as a house warming present for our old house. It even says "Chef Knife" or something like that on the knife. heee hee And this sucker is sharp too. I sliced some of my nail by accident while making this curry. ~_~
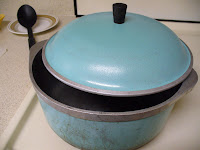
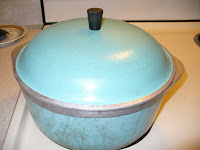
The pot is probably what you United States Americans call a "Dutch Oven." In Guyana we call it a "
Karahi". I really feel like this is an important tool for the job. But it may just be that my last curry got burnt because I cooked it at too high a temperature and on the big, wide burner. I chose chicken thighs this time around because 1) it was cheaper and 2) when my mom makes curry (hers is usually an entire chicken cut up - bones included), the dark meat is usually the type I prefer. After having made my own curry with dark meat for the first time, I find that it doesn't make a big difference and maybe even that the white meat is a little better at absorbing the flavors. Also, I chose boneless because I don't want to cut up bones for one, and Acturon doesn't like bone in chicken in general. Finally, oil and salt. I usually try to get canola oil instead of vegetable oil, but I think when we got this oil we were trying to go for cheaper and/or I may have been under the impression at the time that my mom only used vegetable oil for making curry. But I think I've since been corrected on that assumption and that my mom may even use EVOO (extra virgin olive oil) to make her curries these days.
Okay so finally on to the preparation! This is much longer than my usual cooking blogs, eh?
As you can see, I've peeled the potatoes and cut them into quarters. I left one potato cut in half just as a demonstration. Those two pieces were later cut in half again.
I took the chicken pieces and cut off as much of the fat as I could without cutting into the chicken. I probably would have been able to get a lot more fat off if I had used a smaller knife. =/ Typically, I cut each piece into about 2-3 pieces, depending on the size of the piece I picked up. The second picture is a demonstration of the size of a single, already-cut piece. Okay onto the most important part (in my opinion) - the proportion of seasonings!
Alright, the most important thing to note first is that the measuring spoons are actually the dessert spoon and eating spoon shown earlier - not actual measuring spoons. This is not a proper recipe in that respect, but still the proportions matter so that's why there are so many pictures involved.
So, first I took 3 eating-spoons of my green stuff. :) Feel free to make your spoons heaping. As my mom said, this is where a lot of the flavor for the curry comes from. I went a little shy myself because my jar is almost empty and I've yet to get a new blender.
Next, I added the curry powder. Two sort of regular-heaping-ish eating spoons worth. The middle picture shows approximately how high I piled it. Again, two of those.
The final picture is actually the little dessert spoon. As you see, I tried to make it as level as possible. This spoon contains the garam masala. This part is pretty important. I can't remember why exactly, though. lol I know my mom said that too much or too little can really change the curry - not only for the taste, but also the texture.
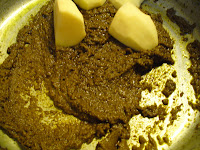
Okay. So, to the left you can see how all the different proportions look inside the bowl. The next step is to add water. You don't want to add too much or too little. Too much will make it too water, too little and it will wind up too dry. I was actually worried that I put too much water in mine because I was dumb and held the bowl under the faucet before adjusting the force of water. Filtered water comes out of my faucet with a much greater force (since it's tunneled through a smaller exit). Lucky for me the proportion came out all right, though. Anywho, you mix it together until it comes out like a loose paste. No funny comments about what it looks like! :P
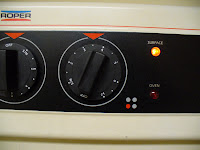
I set the temperature to the same setting I'd used for the alfredo because they are both equally as temperamental. I think my mom said she normally leaves it 4 and it's okay. I think it may have been safe for me to leave it at 4 also and the chicken and potato would have gotten a nicer brown coating, but I wasn't staying at the stove for the whole process so I went with the safer 3.5 setting.
Okay so first you make sure that your pot is heated long enough to get to the temperature you set it to. As my mom always says, "Hot pan, Cold Oil, Food won't stick." :) So, after the pot has had some time to heat up, then you add oil to cover the bottom. Pour your pastey mixture into the pan and swish(TM - just kidding lol) it around!
Now here is where the beauty of digital cameras comes into full play. Normally I couldn't tell you how long I let it cook for before adding the potato and chicken. But thanks to the magic of modern technology (*snort*), I can tell you exactly how many minutes passed between this swish-picture and the following "oops I started adding the ingredients and forgot to take a" picture. :) And that length of time is equal to: *drum roll* 7 minutes. This was approximately the length of time that I let the seasons cook in the pot (with me swishing it around for another 3-4 times). Yes I'm one of those impatient cooks that likes to stir stuff a lot while I stare and wait for it to cook. lmao If it were my mom she'd probably only stir it 2 times total and let it sit and cook and bubble on its own. haha
In this "oops I started adding the ingredients and forgot to take a" picture, I tried to demonstrate what state the seasonings were cooked to. It looks browner in this picture, but that may just be because I turned the stove light on and turned off the flash on the camera. Once I felt the seasons were cooked enough I started by adding the potatoes, then threw in the chicken.
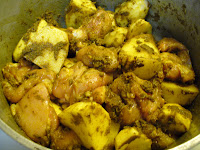
Stir the pot so that your potato and chicken pieces all get a fair coating of the yummy delicious seasonings and then let it sit in the pot for 5 minutes.
After 5 minutes have passed, you can come in with the salt man! If you click on the picture above it should allow you to essentially zoom in to get a better view of how much salt coating I did. I tried to do a light sprinkle over the entire pot. In this session, I sprinkled, stirred, sprinkled one more time and stirred. If you sprinkle heavier, then I would say only do it once. Unless you really like salt, but y'know the doctors tell you it's not good for you. :P Water retention and what not - and it leads to high blood pressure .. or at the very least if you have high blood pressure then you'd better chill with the salt. lol
Ok so now you get the really important step that I didn't do when I first started cooking curry. Also the last time I made curry I didn't cover my pot. =/ Anyway this important step is known as "letting the curry spring water" or rather, letting the potato and chicken spring water. To be honest, I lowered the temperature to 3 at one point, but I can't remember at what stage I did it. I don't think it was this stage, but it may be midway through this stage... *sigh* stupid swiss cheese memory.
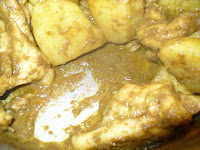
This is an example of the "spring"ed water. If you scroll up, you can see the difference between this and the dry pot prior to covering the pot. This picture was taken 42 minutes after the closed-pot picture. I actually let it cook (covered) for another 40 minutes or so after this (more or less an hour total). However, I did check on the pot approximately every 15 minutes to stir and try as much as possible to keep it from sticking to the bottom. If you're paying close attention, though, you'll know that I failed to keep it from sticking as I had broken some of the potato which got mixed into the curry. Although to be fair, I think a lot of that happened when I tried to dip the spoon into the middle to stir and wound up cutting a piece of potato in half.
On that note, a good way to tell when you're done with this water-springing, covered pot process is when first of all you have a considerable amount of natural liquid in the pot and secondly your chicken and potato pieces are fully cooked. In my case, I think I cooked my curry a tad too long since my potato was so easily squish-able. Man, I am all about the high tech cooking terms, right? :P Really once you've reached this stage, you are done. However some, like me, may prefer to have more ... serwa? surwa? I have no idea how to spell it. Some may call it "sauce" or "gravy" or "flavored water" lol. If you want the most condensed flavor, then you may end your curry cooking process here. If you want more liquid stuff, then you may continue as I did.

When the curry was done cooking, I heated up some water in the microwave. I added half a cup of water at a time. Ultimately for my curry I added 1 cup (1/2 cup, let it bubble up some and then 1/2 cup more). My mom said that was probably too much, but I did let it cook back down/boil up/down. This may also have led to my potatoes being so smushy (dude, I should just start my own cooking dictionary, right?). I'm 99% sure that this is a picture after adding the first 1/2 cup of water. And before adding the final 1/2 cup of water.

Here we ultimately have the finished product. This, ladies and gentlemen, is my finished pot of Guyanese Chicken Curry. This is after adding the 2nd 1/2 cup of water and letting it boil up for a bit (uncovered).
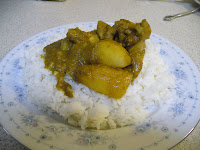
To serve, cook a pot of rice and plate it, then top with yummy delicious curry. :) My family and I eat it with a spoon, but Acturon seems to prefer eating his with a fork. The method of mixing differs from person to person as well. I think my parents mix it all together and then eat it and sometimes add dhal (a recipe perhaps for another day). I personally mix it with part of the rice at a time, cutting a piece of chicken and a piece of potato to have with each mouthful. :)
Note that you can also eat this with my personal preferred method, dhal puri. This is a type of
roti with flavored ground peas inside of it. I've made it before with my mom, but never myself from scratch. That, also, would be a recipe for another day. If you live in New York you can always get your dhal puri pre-made from a restaurant called
Sybil's. If you live here in Huntsville, you can go to Jordan Lane and get some from a restaurant called
Curry-N-A-Hurry. Incidentally you can also just purchase chicken curry from them, but the chef there is Trinidadian and I personally feel that their curry tastes much different from ours (read - not as tasty :P). However, they kick my butt to Timbuktu and back with their dhal puri. I'd have to try extremely hard to make it as yummy as theirs. For those of you in New York, I can't remember having the curry from the, but since they are a Guyanese based location I imagine it would taste the same as ours. Sybil's also has a lot of other delicious stuff to sample.
Alright we're finally done here. lol I hope your attempts come out as good as this one did for me. And I hope even more so that this blog helps me to make mine equally as good in the future - without having to call my mom again!! :)


