Tuesday, November 9, 2010

Cataclysm Head & Shoulder Enchants

Hey everyone! Another Cataclysm Guide thanks to Totalhalibut/Totalbiscuit/The Cynical Brit. To watch the complete video click on the link below:


This is a quick writeup to help you to know right away where you want to focus your questing so that you have the reputation you need when you hit level 85 to get your head and shoulder enchantments. Yes, you can only apply these at level 85.

Same - Just like Wrath of the Lich King, you will be able to pick up a tabard once you are friendly to further your reputation gain while running heroics.

Different - Unlike Wrath of the Lich King, the "Lesser" Shoulder enchantments are not equivalent to the previous expansion's "Greater" enchantments. Not only are the secondary stats a bit different due to the new features of Cataclysm, but the actual stat bonus is a bit larger as well.

I'll begin with the head enchantments. The cost appears to start at 150g, but of course by the time you're revered that cost goes down to an amount equal to 120g, I think - possibly 135g at revered and 120g at exalted.

Mount Hyjal (Kalimdor) 78-82
Quartermaster is found in Nordrassil
Revered with the Guardians of Hyjal

Arcanum of Hyjal: 60 Intellect & 35 Critical Strike Rating

Vashj'ir (Eastern Kingdoms) 78-82
Quartermaster is found in the following path:
Shimmering Expanse -> Shimmering Grotto -> Silver Tide Trench -> Silver Tide Hollow
Revered with The Earthen Ring

Arcanum of the Earthen Ring: 90 Stamina & 35 Dodge Rating

Uldum (Kalimdor) 83-84
Quartermaster is found in Ramkahen
Revered with Ramkahen (Cat people)

Arcanum of Ramkahem: 60 Agility & 35 Haste Rating

Twilight Highlands (Eastern Kingdoms) 84-85
Quartermaster is found at the Bloodgulch

Arcanum of the Dragonmaw: 60 Strength & 35 Mastery Strike Rating


Next up, Shoulder Enchantments. All of these can be found at Deepholm in the Maelstrom. The Quartermaster is located at Therazane's Throne. From what I could tell, they are all 60g. Deepholm is a level 82-83 zone according to wow wiki.

The following are the shoulder enchantments for honored reputation:

Lesser Inscription of Charged Lodestone: 30 Intellect & 20 Haste Rating

Lesser Inscription of Jagged Stone: 30 Strength & 20 Critical Strike Rating

Lesser Inscription of Shattered Crystal: 30 Agility & 20 Mastery Rating

Lesser Inscription of Unbreakable Quartz: 45 Stamina & 20 Dodge Rating


The following are the shoulder enchantments for exalted reputation:

Greater Inscription of Charged Lodestone: 50 Intellect & 25 Haste Rating

Greater Inscription of Jagged Stone: 50 Strength & 25 Critical Strike Rating

Greater Inscription of Shattered Crystal: 50 Agility & 25 Mastery Rating

Greater Inscription of Unbreakable Quartz: 75 Stamina & 25 Dodge Rating

And yes, this faction does include a tabard at friendly for heroic reputation runs.

Now, I'm not sure why the Arcanum of Dragonmaw says "mastery strike rating" while the shattered crystal ones say "mastery rating." I don't know if that is something specific with that type of melee dps or just a inconsistency or error of some sort. Also, this information is from the Beta, so it is subject to change. But I wanted to share this to give everyone an idea of where to start/focus questing. And of course, each quartermaster also has gear you can get as you level up so check that out as well. Totalhalibut goes through each item at every quartermaster in the video I linked above.

Friday, October 29, 2010

4.0.1 Fire Mage Guide

I was typing an email to Acturon today in an effort to help him with some mana efficiency troubles on his mage and he recommended I write a mage guide. I'm not interested in doing an entire website for it, but I thought this might help anyone reading this that is a fire mage or considering it.

The information that I used as research comes first from Totalhalibut's YouTube mage guide:
and secondly from simply reading the talents myself. I took Total's recommendations and scaled them down for lower leveled mages and then I will build it back up for level 80 and finish up with the full Cataclysm rotation that he finishes the video with.

Before we begin, I want to list the talents that you will not be taking. Please keep in mind that this entire blog is directed towards PvE gameplay and not PvP. Here's the list:
  • Blazing Speed - b/c this isn't pvp and your talents can be better spent elsewhere
  • Improved Scorch - b/c you won't be casting it much anyway
  • Molten Shields - again, more pvp related
  • Firestarter - this one you may want to take when you start doing Cataclysm instances that require you to be on the move a lot more, but you can wait to decide on that later on.
Level 25
To begin with, at soon as you hit level 25, go to the AH and get yourself the Glyph of Fireball. This glyph adds 5% crit to your fireball spell. This is massively valuable to you because at this point you should already have two talents that are directly affected by your spell crits. The first one gives you back mana and the other one turns your spells into free dots. So more mana and more damage.

Level 29
By level 29 you will begin to use what I consider the most valuable talent in the fire tree: Hot Streak. At this time your talent tree should look something like this:


You can see the two talents that benefit from spell crit. Master of Elements returns 30% of your base mana every time you crit. And Ignite take your spell crits and make 40% of your damage become additional damage over time. Spell Crit is your friend, indeed. ^_^

Feel free to put your 2 points of Impact into Fire Power instead, but I figure at these levels your tanks are probably pulling multiple targets and you'll want the extra aoe dmg potential, but that's your call. The important point here is that if you limit yourself to only 5 points in the first tier and 5 points in the 2nd tier, then you can put that 1 point you get at level 29 into Hot Streak.

Also, Total recommends putting your 3 points all into Burning Soul instead of 1 point and 2 in Improved Fire Blast like I recommended. Later I recommend the same thing, so if you don't want to spend the gold on respecing later, then go ahead and do it Total's way from the start. However, bear in mind that you will then no longer have the 8% Fire Blast crit that I reference below. Overall you may consider that a non-issue.

What's so special about Hot Streak? Every time you crit with fireball, you have a chance of procing Pyroblast, making it instant cast and mana free. There are other spells that trigger it also, such as Fire Blast. If you follow the recommendation link above, you'll have an 8% chance to crit with that. So 8% with Fire Blast and 5% with Fireball = increased chances of a free and instant Pyroblast. So here is the rotation I recommend at this stage of the game:
  1. spam Fireball
  2. Fire Blast whenever it's up
  3. on hot streak only: Pyroblast
Level 39
As early as level 39 you will be able to put your first point into Improved Hot Streak, which essentially increases your chances of procing Pyroblast, which is fabulous. So now, when you get two non-periodic crits in a row, you have a 50% (and at level 41 it becomes 100%) chance to proc Pyroblast. BTW non-periodic means that your crits from dots don't count for inducing a proc. The following is the talent setup that I recommend (obviously at 41 you use that talent point to complete your Improved Hot Streak):


Notice that I took a point in Blast Wave. This is great for aoe damage on trash pulls and you should definitely add it to your rotation. So your spell priorities should look pretty much the same, but for the one additional spell:
  1. spam Fireball
  2. Fire Blast whenever it's up
  3. on hot streak only: Pyroblast immediately upon procing
  4. if more than one mob: Blast Wave
Even if there are no other mobs around to spread your dots, Fire Blast is still good to cast because it adds to proc potential for Pyroblast. I believe at the later levels hot streak will proc more frequently and you will not need Fire Blast anymore, but we'll get to that later.

Level 59
At level 59, Scorch finally has a valuable purpose to in your rotation thanks to a talent called Critical Mass. Here is the recommended talent tree:


You will eventually want to take Dragon's Breath because it's required to get Living Bomb, but there is no use in investing those points now. Total said the spell is a waste of your time. The new talents that we've picked up include Combustion, which turns all those nice crit-induced buffs back into direct damage and creates a new dot that lasts 10seconds. Total recommends that you wait on using Combustion until you have a high crit on Pyroblast or Fireball. This is because the dot from Ignite is based on 40% of your crit damage. So, the more you crit for, the more damage your Ignite dot will have. The more your Ignite dot has, the more your Combustion dot will do in turn.

In addition to Combustion you'll have Molten Fury which increases the amount of damage you do when your target is near death. More damage is always nice. :) You will also pickup Improved Flamestrike. This talent is really awesome for aoe/trash pull damage. Not only does it turn your Flamestrike into an instant cast spell, it will be automatically cast every time that your Blast Wave hits more than one target! Awesome, right? :)

In order to access all these lower tree goodies, I also grabbed Cauterize from the third tier. Hopefully you will never need this, but it's nice to have the instant and free reincarnation just in case.

Okay so all of this so you can get to Critical Mass. Here's what's so awesome about that talent. It does make your Living Bomb and Flame Orb do more damage, but at this stage of the game you don't have that yet so that doesn't matter right now. What matters is the 5% extra crit it produces from the target that has your Critical Mass debuff. Remember, we love crit because it not only means more mana and more dots, but it also means more hot streaks! You will be getting this extra crit initially by casting scorch. At level 59 you only have a 33% chance of procing the debuff on your target, so you might have to cast it more than once until you reach level 63 and then it becomes 100% chance upon casting scorch. Until then, you will continuously cast scorch until it procs OR if you're lucky enough that your scorches induce a hot streak, then throw in a Pyroblast because Pyroblast also has a chance to induce the Critical Mass debuff. But again, at level 63, your first scorch will be all that it takes. Once you have that debuff, continue with your rotation.

Okay so without further ado, here is your new rotation:
  1. Scorch (until you get Critical Mass, which will take only 1 casting at level 63 when you make it 100%)
  2. spam Fireball
  3. Fire Blast whenever it's up
  4. on hot streak only: Pyroblast immediately upon procing
  5. Combustion: save for when you have a nice, high crit from Pyroblast or Fireball
  6. if more than one mob: Blast Wave (flamestrike will go down automatically)
At this time, if you feel you are getting enough crits with Fireball to induce Hot Streak and no longer want Fire Blast in your rotation aside from spreading your dots, you may wish to swap your talents to Total's recommendation in that top tree - giving yourself full points in Burning Soul and no points in Improved Fire Blast. That is of course assuming that you didn't already make it that way from the start.

Level 69
Moving on, level 69 is the earliest point that you can get Living Bomb.


Living Bomb is a dot that lasts 12 seconds. When those seconds are over, it explodes and does aoe damage to nearby enemies. To get to it, you'll need to pick up the Dragon's Breath as we discussed at the top and 1 point in Pyromaniac. Once you have Living Bomb, your rotation grows into this:
  1. Scorch (only once now b/c you have it at 100%)
  2. Living Bomb
  3. spam Fireball
  4. on hot streak only: Pyroblast immediately upon procing
  5. Combustion: save for when you have a nice, high crit from Pyroblast or Fireball
  6. if more than one mob: Blast Wave(flamestrike will go down automatically)/Fire Blast
Your final rotation change will come at level 81, when you finally get Flame Orb. At this stage, Total's video of rotation recommendation comes into full effect:
  1. Scorch (only once now b/c you have it at 100%)
  2. Living Bomb
  3. Flame Orb
  4. spam Fireball
  5. on hot streak only: Pyroblast immediately upon procing
  6. Combustion: save for when you have a nice, high crit from Pyroblast or Fireball
  7. if more than one mob: Blast Wave(flamestrike will go down automatically)/Fire Blast
Level 71 and beyond
The following is a list of the remaining talents I recommend beyond level 69.

Put your last point into Pyromaniac.

3 Points - Arcane Concentration (Clearcasting!)
3 Points - Piercing Ice (Spell Crit!)
2-3 Points - Netherwind Presence (Spell Haste!)

Depending on your preference and experience when Cataclysm comes out, that final variable point for spell haste can be used to pickup Firestart and allow you to cast Scorch while moving.

This concludes my Fire Mage Guide. Please bear in mind that I am in no way an expert on mages. Not only is a mage not my main class, my highest level mage is still running Burning Crusade content. This is simply my logical recommendations based on the research I have done from watching Totalhalibut's video and reading the talent trees. I may be completely wrong about a lot of things, but it's a great place to start if you are new to the game or simply just want to try something different to see if it will work better for you.

If you have any questions, particularly an explanation of some of the geek terms that have been abbreviated or simply left undefined, feel free to put it in a comment. Hope some of you found this useful! If this proves successful, I may post another one for Frost Mages.


Sunday, October 17, 2010

Hearty-Enough Beef Stew & Bread

I actually made this stuff like a month ago, took the pictures and all and then completely forgot to blog about it. I came across the pictures while I was uploading a video I was recording and was like "oh yeah!" hah. I make no pretenses here, this meal was by no means easy for me to make. I'm a weakling, I guess. As I made this I got a blister on my finger and I was starving so I was almost entirely devoid of energy (like maybe 5% of a 100 scale of energy rating) by the time I was finished with all of it. Which incidentally, is the reason this is the "hearty-enough" beef stew. Because it's actually supposed to have like a couple of more things added to it but by the time I was done cooking it I had completely forgotten about the final steps and wanted only to dig in. It was well hearty enough as it was, anyway. :P Ok so here are the recipes that I used. Both of them come from The Pillsbury Cookbook and I couldn't tell you what year it is because I don't see that information on here anyway. But, I think this may be the ISBN number for it: 0-385-23867-3>2295. Yes it has a ">" in there and I have no idea what that is for, either. lol

Ok so first the recipe for the stew:

Hearty Beef Stew
1 1/2 to 2lb. boneless beef stew meat, cut into 1 1/2-inch cubes
1/4 cup all purpose flour
2 teaspoons salt
1/4 teaspoon pepper
3 tablespoons oil
2 cups water
8-oz. can (1 cup) tomato sauce
2 beef-flavor bouillon cubes or 2 teaspoons beef-flavor instant bouillon
2 stalks celery, cut into 1-inch pieces
2 medium onions, quartered
1 bay leaf
6 carrots, cut into 1-inch pieces
4 medium potatoes, cut into pieces
2 tablespoons flour
1/4 cup water
1 cup frozen peas or cut green beans
Chopped fresh parsley, if desired

Coat beef cubes with mixture of 1/4c flour, salt and pepper. In 5-quart Dutch oven, brown meat in oil. Stir in 2 cups water, tomato sauce, bouillon cubes, celery, onions and bay leaf. Bring to a boil. Reduce heat; cover and simmer 1 1/2 hours or until meat is tender.

Remove bay leaf. Add carrots and potatoes. Cover; simmer an additional 30-40 minutes or until vegetables are tender. In a small jar with lid, add 2 tablespoons flour to 1/4c water; shake well. Stir into stew mixture. Stir in peas. Cook over medium heat until mixture boils and thickens, stirring frequently. Garnish each serving with parsley.

The italicized stuff is meant to highlight all the things I forgot to do which left the stew being less than hearty. lol But it still came out delicious so no one was complaining. :) Okay now for the bread:

French Bread Braids
4 3/4 to 5 3/4 cups all purpose flour
1 tablespoon salt
1 tablespoon sugar
2 pkg. active dry yeast
2 cups water
2 tablespoons shortening
1 tablespoon water
1 egg white

Grease large cookie sheet. In large bowl, combine 3 cups flour, salt, sugar and yeast. In small saucepan, heat 2 cups water and shortening until very warm (120 to 130°F). Add warm liquid to flour mixture. Blend at low speed until moistened; beat 3 minutes at medium speed. Stir in 1 1/2 to 2 1/4 cups flour to form a stiff dough.

On floured surface, knead in 1/4 to 1/2 cup flour until dough is smooth and elastic, about 8 minutes. Place dough in greased bowl; cover loosely with plastic wrap and cloth towel. Let rise in warm place (80 to 85°F) until light and doubled in size, about 1 hour.

Punch down dough several times to remove all air bubbles. Divide in half; divide each half into 3 parts. Roll each part into a 14-inch rope. Braid 3 ropes together; seal ends. Place on prepared cookie sheet. Repeat with other half of dough. In small bowl, combine 1 tablespoon water and egg white; beat slightly. Carefully brush over loaves. Cover loosely with greased plastic wrap; let rise in warm place until light and doubled in size, about 20 to 30 minutes.

Heat oven to 375°F. Brush loaves again with egg white mixture. Bake at 375°F for 25 to 30 minutes or until golden brown. Remove from cookie sheet immediately. Cool on wire racks.


Okay first I am going to give props to Acturon for helping me peel the vegetables and for helping me with a number of other things while making this recipe. He's an awesome husband. ^_^ Second, don't do what I did up there. Put your carrots with your potatoes and your onions with your celery because that's the order they go into the stew. Don't be like me and fail at reading ahead. lol Actually I did read the whole recipe several times, but I didn't retain that detail, I was mostly trying to work out how the downtime of the stew with the downtime of the bread. By downtime I mean things like "simmer for 1 1/2 hours" and 'let rise until double in size, about one hour" .. see? I can sorta multi-task. :P

Okay so yeah obviously make your life easier and chop everything up ahead of time (and plate them together appropriately ~_~) so that when the time comes for the item you can just drop it in. Yes I know some of you have the ability to chop things super fast and not take one hour to chop stuff (yeah I think I really did), but for the rest of us, it's a good idea to chop and sort ahead. I was lucky enough to have beef from my mother-in-law that was already pre-cut at the store. I don't normally buy beef so if it's normal for stew beef to come already cut then .. oh well laugh it up. :P

Okay so as per instructions - flour mixture and beef. I always mix all my flour stuff together first before adding the next type of ingredient. For example when baking cake/cookies, I mix my flour and sugar together before adding milk/eggs whatever. In this case, before adding beef. Yeah I know that's probably exactly what it says in the instructions and I'm likely stating the obvious here, but you never know. Maybe someone doesn't know that. :P Also, I mix it all with my hand/fingers. I doubt that makes a difference, but it would at least let you feel how distributed your grainy salt/sugar is in the mixture. Ok so then you mix it all together. Professional probably toss the bowl to do this and manage to not have everything end up on the floor. For entirely unprofessional me, however, I just used my hands. :) Yes, I got clumps of gooey flour stuff when I was done, but hey that's what soap and water's for, am I right? :P

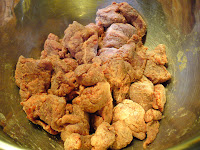
This is the meat all browned and stuff. I guess it doesn't look particularly appealing in this picture, but it sure was appealing in my mouth when it was all done and over with. :P (The whole stew I mean, not this stage). BTW I did brown this meat for a considerable length of time, making sure it got like, well, brown. I don't just mean flour-turn-brown, I mean like where it does that like "searing" looking kind of browning. El Oh El at me and my technical terms. Anyway I didn't go out of my way to get everything 'seared' or whatever, just some bits. The picture's blurry if you enlarge it so it's not a very good help for clarification purposes. You'll just have to take my weirdly descriptive word for it. :)

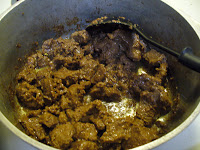
Okay, so here we are with the water and bay leaf and bouillon cubes and what not. I tried my best to mix up that bouillon good before moving onto the next stage. I know most people probably wouldn't bother because it will all melt down and mix up eventually anyway. But I personally do not trust my mixing skills ever so I tend to mix things in tinier early phases (like the flour deal) rather than relying on my ability to mix it all properly when it's done. I just feel that I lack the strength and coordination to do it properly later, so I compensate by doing it earlier and between each phase. It's a good compromise, I think. :)

Okay so here we have added the celery and onions. Again, please don't be like me - having to sort though the plate so that no carrots or potatoes accidentally drop into the pot - or having to pick out onion/celery from under a potato/carrot. Put your bloody onions and celery on the same plate and make your life easier so you can just drop the whole dang plate into the pot at this stage without all that stupid hassle that I went through. lol Okay so this is like Phase One of the Stew and the overall cooking. Time to move onto the bread part!

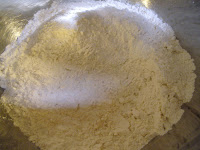
I have bad news overall regarding the bread photos. I forgot to take pictures for most of the middle part of this bread making process, which incidentally is the hardest part of the process. Boo me for forgetting :( But I'll still commentate for ones I did take pictures of. Here I have the flour mixture with the yeast (and sugar/salt whatever else the recipe calls for up there). Again I mixed it with hand and tried to make sure the yeast bits were evenly distributed. I tried to get the detail in the picture, but unless you have a careful eye and know what you're looking for, you probably won't see the yeast bits in there.

Okay so here is my measured shortening. I smush the shortening into the measuring spoon and then level it off with the flat edge of a butter knife to make sure I have an accurate measurement. I don't think they sell shortening in pre-measured sticks, do they? Maybe they do, but I always get it in the can anyway.

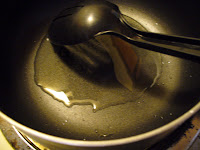
Okay here is what the shortening looks like when it's melted. Now unfortunately this is the last picture I took of the bread making process until after all the rising was completed. I'm not sure whether I was just exhausted or if I was actually relying on Acturon for remembering to take pictures because I know in this process there would be a lot of pictures missing if he hadn't popped into the kitchen and asked if I was/did taking/take a picture. I'm also willing to guess that this process was messy and I just couldn't have been bothered to take pictures after cleaning myself up.
Either way, I totally forgot so here's a quick verbal description. I had no way of measuring the temperature of anything so I just tried to reason it out in my head. The bread wasn't perfect, but it came out alright/good enough for us. Honestly I don't know what a perfect french braid bread would come out like anyway, but I'm assuming it would be fluffier than what mine was. Anywho my measure of 120°F was "I saw steam coming from the top of the pot" lol and my estimate of 80°F was "stick it on the counter next to the pot of stew that's being cooked in this air conditioned apartment" lol! Love it? haha So anyway I did what the instructions said and like took a note of the time so I'd be sure to be back in an hour for the bread - and then went on to play WoW or something probably until my stew timer went off. lol

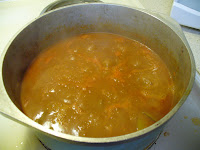
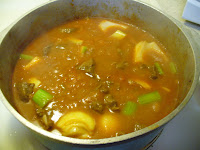
Okay so when the stew timer came off this is what my onions and celery looked like (after 1.5hrs of ... stewing.. lol! I crack myself up). Looking yummy already right? Now they said to remove the bay leaf, but I'll be honest - I couldn't find it. hahaha And Acturon didn't care so I just left it in and then added the carrots and potatoes. Hey, it can only add to the flavor right? >.> HAHA :P
Putting in the carrots and potatoes was a lot easier with the onions and celery out of the way. *sigh* lol Stirring this was a bit of a hassle but not a big deal. Just take your time and more like "rotate" the pot of stuff rather than "stir." I learned that trick from my friend Amanda. ^_^ Well I guess normal people call it "turn" instead of rotate, but whatever, I'm weird.

Okay so again more phases of the bread stages missing. At this point I've already let the dough rise and did this neat little trick that Acturon looked up online that involves punching your two fingers into the dough. When the indentation stays, you know you let it rise long enough. That was fun, but not as fun as punching the dough entirely "to get the air bubbles out." Not gonna lie, I had a lot of fun turning my bread into a mini punching bag. lmao I wasn't THAT brutal with it, but I had fun without a doubt. :) Perhaps this may have something to do with my bread not being fluffy. lmao Hey life's all about making mistakes and having fun .. or something.. right? lol Oh yeah btw, the above picture is one half of the dough used to make the loaf below.

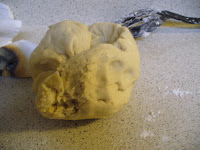
Ta da! One French Bread Bread dough complete.. and then I realized I should have demonstrated how it was done. lol

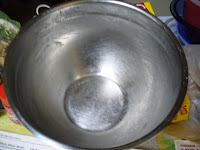
But before my demonstration, I decided to photograph the greased bowl.. lol I think this was me realizing I didn't take hardly any pictures of the bread process and I was trying to make up for it. Because at this point the bread had finished rising in said grease bowl and were already punched (haha) and divided. Ignore the stuff scattered on the table, please. ~_~*

Okay so NOW I decided to show something of the process, but again I was taking the pictures myself and I didn't want to get my camera dirty so there aren't like pictures of it mid-braid. But you take one half of your dough and turn into 3 and roll them into ropes. I didn't use anything to measure my rope length as you will observe in a later picture. lol And to be honest I had difficulty rolling these ropes. It kept like .. not wanting to roll and like slide instead or something. Really annoying. Which reminds me of something else I had difficulty. Y'know that phase you read about blending it? At first when I was blending I was like "oh my god, there is not a dough forming here - I messed up." Then suddenly not only was there dough, but it kept crawling up blender and sh*t. It was crazy and nuts like it had a life of its own. And sh*t, it's yeast which is a living organism or something so I guess I shouldn't be surprised. Creepy though, still creepy. *nod* lol
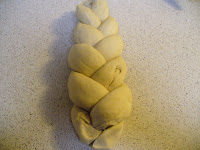
Let me just say, I truly suck at "sealing" my ends. I mean it wasn't terrible, but let's just say a professional baker would not want me to be his/her representative french braid bread person. lol Mostly my braid stayed together as you will later see, but the end bit came undone some - not unlike my own hair if I don't end it with a ponytail holder. So yeah.. maybe they should make bread tail holders. *nod* lol no, I'm not serious. haha

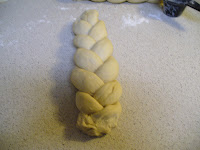
Ta da! See what I mean about me not measuring my ropes? SIGNIFICANT size difference, eh? lmao And pst, shh don't tell anyone but at one point I got tired of trying to "roll" out my ropes and just pulled the two ends until it was longer. LMAO NOT professional. Did I mention this was my first time making bread? LOL Not my first time working with yeast, though. I've made Cinnamon Buns and Dinner Rolls before, which came out great actually. But this .... was good, but definitely not great. lol Perhaps I can blame the different counter.. yeah that sounds like a good scapegoat. lmao :D Oh yeah these are the already egg white washed loaves, I think. I'm not sure if that pan is considered a cookie sheet officially or not, but whatever, it worked. I think it might be what they refer to as a "shallow baking pan." I don't really know if I'm correct on that or not.

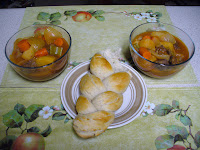
And here we have the finished product! Pretty, right? :) And it tastes like a homemade yeast bread. lol AND it wasn't a piece of rock the next day either! *pats self on the back* lol

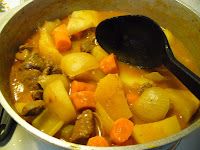
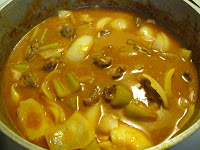
And here's my finished stew. Remember, you're actually supposed to do some like flour mixture to thicken the stew and add your peas and green beans. But the bread was done, I was hungry, and the potato added enough thickness to the stew for me. And as you can see, it was plenty hearty enough as it was. lol

Hope you enjoyed reading this and that I inspired you to someday make your own stew and bread. I'll bet yours comes out even better than mine. ^_^ It sure tasted delicious! =D

Tuesday, August 24, 2010

Cataclysm Beta Guild Leveling System

Before I begin I need to make a few points. First, I am not in the Cataclysm Beta, I simply watched the video of TotalBiscuit's coverage of it on YouTube. Second, credits and whatever legal stuff to mention like the fact that this information is like property of Blizzard or something and you can go to The Cynical Brit dot com for the video that I watched to receive this information, or simply click here. Third, being as this information is in Beta, it is subject to change before final release so don't get your panties in a twist if it's not the same when the game comes out. Finally, anything additional that I add will be written in [brackets]. Mainly this is just identifying that something is Rank II, because from the video, the game does not actually specify, though it is understood. Soz, that was a run-on, eh?

Level 1: Fast Track - Experience gained from killing monsters and completing quests increased by 5%.

Level 2: Mount Up - Increases speed while mounted by 5%. Not active in Battlegrounds or Arenas.

Level 3: Mr. Popularity - Reputation gained from killing monsters and completing quests increased by 5%

Level 4: Cash Flow - Each time you loot money from an enemy, an extra 5% money is generated and deposited directly into your guild bank.

Level 5: Fast Track [Rank II] - Experience gained from killing monsters and completing quests increased by 10%.

Level 6: Reinforce - Items take 5% less durability loss when you die.

Level 7: Hasty Hearth - Reduces the cooldown on your Hearthstone by 15 minutes.

Level 8: Reinforce [Rank II] - Items take 10% less durability loss when you die.

Level 9: Chug-A-Lug - The duration of buffs from all guild cauldrons and feasts is increased by 50%.

Level 10: Mobile Banking - Summons your guild bank. (Instant Cast, 1 Hour Cooldown)

Level 11: Mr. Popularity [Rank II] - Reputation gained from killing monsters and completing quets increased by 10%.

Level 12: Honorable Mention - Increases Honor points gained by 5%.

Level 13: Working Overtime - Increases the chance to gain a skill increase on tradeskills by 10%.

Level 14: The Quick and the Dead - Increases health and mana gained when resurrected by a guild member by 50% and increases movement speed while dead by 100%. Does not function in combat or while in a Battleground or Arena.

Level 15: Cash Flow [Rank II] - Each time you loot money from an enemy, an extra 10% money is generated and deposited directly into your guild bank.

Level 16: Guild Mail - In-game mail sent between guild members now arrives instantly.

Level 17: Everyone's A Hero - Increases Heroism points gained by 5%.

Level 18: Honorable Mention [Rank II] - Increases Honor points gained by 10%.

Level 19: Happy Hour - Increases the number of flasks gained from using a flask cauldron by 100%.

Level 20: Have Group, Will Travel - Summons all raid or party members to the caster's current location. (5.94 sec cast, 2 Hour Cooldown)

Level 21: Chug-A-Lug [Rank II] - The duration of buffs from all guild cauldrons and feasts is increased by 100%.

Level 22: Bountiful Bags - Increases the quantity of materials gained from Mining, Skinning, Herbalism, and Disenchanting by 15%.

Level 24: Everyone's A Hero [Rank II] - Increases Heroism points gained by 10%.

Level 25: Mass Resurrection - Brings all dead party and raid members back to life with 35 health and 35 mana. Cannot be cast when in combat. (Unlimited Range, 9.9 sec cast, no cooldown)

As you can see, guilds will be getting quite the buffs. If I remember accurately from the 2009 Blizzcon videos that I watched on YouTube, we are supposed to gain experience from doing things as a guild. Something like 75% (may be higher) of the group/raid needs to be guild members. Having composed that group ratio, you and your party/raid members will begin to earn experience for the guild as you proceed in your dungeons, raids and battlegrounds. Additionally, I believe the guild also gains experience for levels gained (alt leveling heaven!) and for working on tradeskills, but I could be incorrect on at least the last one. The tradeskills may only be for achievements.

I imagine it will take a considerable length of time for small guilds to get to level 25, and there is a cap for large guilds as in it only counts the top [insert arbitrary number here] member contributers.

While all the additions are awesome, such as gains in experience, reputation, honor points, etc. The really cool features are the ones that have only one rank. Aw heck, they're all really cool, quite honestly. Anyway I thought I'd share this for any of you who may be interested in the detailed list or especially for those of you that didn't know this feature was being introduced.

Monday, August 23, 2010

Novice Guyanese Chicken Curry


I find it quite ironic that I'm fairly decent at making Italian food, but really unskilled at making Guyanese food. I would even go so far as saying it's truly more difficult to cook Guyanese food than it is to cook Italian. In case you're unaware, I am Guyanese, hence the irony. And, as a brief geographical lesson, Guyana is located in the northern part of South America - to the right of Venezuela.

Nonetheless I am happy to say that this session of Guyanese cooking was an unusual success, especially when compared with my previous attempt at chicken curry, which turned out quite burnt. The secret to my newfound success is twofold. First, I tried cooking with a stainless steel saucepan last time and on the big burner at medium heat. Ok perhaps there are actually 4 reasons why the last attempt was a failure. ^^; And "second" -- THIS time I called my mom and sought advice from the expert. =D

As a result, while all blogs are about sharing the cooking experience, this particular blog serves two extra purposes. The most important one (for me) is that it will be here as a detailed reminder for me on future attempts because while I have written down instructions several times, I'm hoping this picture blog will work out even better. The other purpose is for my mom to see for herself what I did and offer further recommendations for anything that wasn't done quite right. So, enough with the chatter - let us begin! ^_^


You would think I was making money off all these product plugs, but alas.. lol Okay let's begin with the explanation of what is being presented here. Going counterclockwise from the top right corner of the top left image: A stirring spoon with a dessert plate to capture the mess, the packet of chicken which you can see in greater detail in other picture. Before you freak out, that bottle of green stuff is not a jar full of fungus or mold or anything. =P A couple of months ago when I still had a working blender, I blended together some garlic and onion (possibly some herbs, too). I haven't looked up the science of it, but something about the acids in the mix cause it to turn green, but it is still perfectly good and delicious. Further, the blend of the flavors really enhances the curry flavor - moreso than doing a fresh blend, in my opinion. And yes I realize I messed up my series following the colon but y'know what? I'm not going for a freaking dissertation in English here - this is a colloquial blog about cooking and other crap so get over it. lmao

Ok so the little jar contains a home done blend of "garam masala" or simply masala for short. I believe it consists mostly of Cumin, Anise seeds, and I don't know what else. It's ground together or something. This blend was made by I believe the mother of my dad's cousin - or I think it's my Grandfather's sister? Or sister-in-law? I can't remember exactly. :( The batch was actually given to my mom, who in turn shared some with me. For everyone else, I just googled and found a recipe to make your own blend:


[6/17/11 Edit: I would ditch the cloves and cinnamon and add anise seeds to capture the flavor that was used in this curry.]

Next, you have the tall white container. In that, I keep my share of my mom's curry powder. Now you may feel like you can just go to the grocery store and get their curry powder that they keep in the spice section. And that may even be okay to use. But, I doubt it. I've had a bottle of "cumin powder" in the past and it's much weaker (less potent) than if you were to for example get the seeds. But I guess that's to be expected. However, I didn't expect the difference in potency to be as drastic as what it is. This is the curry powder my mom uses, and I truly believe it makes the difference:


[6/17/11 Edit:
I noticed the link above doesn't link directly to the curry powder anymore. What you're looking for is Lalah's Madras Curry Powder. You can google search it, or take that information to your local grocery store that offers to get specific items upon request (places like Publix/Kroger do it).]

I looked around and they actually have a small box that costs less than $5.00. You can probably purchase your masala from the same place, too. I would also like to take this moment to clarify that the method and ingredients portrayed in this blog is likely to be significantly different from "authentic" Indian curry. This is "West-Indian" cooking, which I presume is vastly different. I guess the Indians in Guyana (and surrounding countries) brought their traditional meals with them, but incorporated the Jamaican ingredients and thus we have a different product with the same name. But I haven't been to India to taste their stuff or watch them cook to really know for sure. All I know is these two things: 1) When I last ate at an Indian restaurant, it definitely tasted different than our stuff. and 2) I tried buying curry powder and garam masala from the local Indian store (not West Indian) and it was very different. I think they add like cloves -- yeah just checked that recipe I linked for masala earlier, and it has cloves and cinnamon. I would say if you're going to make your own, ditch the cloves and cinnamon and add anise seeds. That should give you a blend similar to what I used here. I of course have no idea if that's true though as I have never made my own masala and I did not even witness the making of the masala that I used. I'm going purely off smell here. :)

Okay back to listing the necessary tools. The little container for my large utensils and paper towel roll are not part of it. lol Ok so the bowl, as you will see later, is used to mix the spices and things together. I used 4 potatoes for this curry because I wanted it to last 4 days for 2 people. In reality, one of the pieces of potato got smushed in with the curry (ooo more technical terms! the secret society of cooking secrets and use of confidential technical terms is gonna get me now for sure :P) so that the proportions didn't end up the way I planned. Also, I think I served us more than 1/4 of the curry on the first day so I doubt this is really going to last us 4 days. Oh well.. lol

Nice, big cutting board to cut up your potato and chicken. On that I have displayed a little dessert spoon, a regular eating spoon, a vegetable peeler and my fancy Chef's Knife from the knife set my Grandmother had given me as a house warming present for our old house. It even says "Chef Knife" or something like that on the knife. heee hee And this sucker is sharp too. I sliced some of my nail by accident while making this curry. ~_~

The pot is probably what you United States Americans call a "Dutch Oven." In Guyana we call it a "Karahi". I really feel like this is an important tool for the job. But it may just be that my last curry got burnt because I cooked it at too high a temperature and on the big, wide burner. I chose chicken thighs this time around because 1) it was cheaper and 2) when my mom makes curry (hers is usually an entire chicken cut up - bones included), the dark meat is usually the type I prefer. After having made my own curry with dark meat for the first time, I find that it doesn't make a big difference and maybe even that the white meat is a little better at absorbing the flavors. Also, I chose boneless because I don't want to cut up bones for one, and Acturon doesn't like bone in chicken in general. Finally, oil and salt. I usually try to get canola oil instead of vegetable oil, but I think when we got this oil we were trying to go for cheaper and/or I may have been under the impression at the time that my mom only used vegetable oil for making curry. But I think I've since been corrected on that assumption and that my mom may even use EVOO (extra virgin olive oil) to make her curries these days.

Okay so finally on to the preparation! This is much longer than my usual cooking blogs, eh?


As you can see, I've peeled the potatoes and cut them into quarters. I left one potato cut in half just as a demonstration. Those two pieces were later cut in half again.


I took the chicken pieces and cut off as much of the fat as I could without cutting into the chicken. I probably would have been able to get a lot more fat off if I had used a smaller knife. =/ Typically, I cut each piece into about 2-3 pieces, depending on the size of the piece I picked up. The second picture is a demonstration of the size of a single, already-cut piece. Okay onto the most important part (in my opinion) - the proportion of seasonings!


Alright, the most important thing to note first is that the measuring spoons are actually the dessert spoon and eating spoon shown earlier - not actual measuring spoons. This is not a proper recipe in that respect, but still the proportions matter so that's why there are so many pictures involved.

So, first I took 3 eating-spoons of my green stuff. :) Feel free to make your spoons heaping. As my mom said, this is where a lot of the flavor for the curry comes from. I went a little shy myself because my jar is almost empty and I've yet to get a new blender.

Next, I added the curry powder. Two sort of regular-heaping-ish eating spoons worth. The middle picture shows approximately how high I piled it. Again, two of those.

The final picture is actually the little dessert spoon. As you see, I tried to make it as level as possible. This spoon contains the garam masala. This part is pretty important. I can't remember why exactly, though. lol I know my mom said that too much or too little can really change the curry - not only for the taste, but also the texture.


Okay. So, to the left you can see how all the different proportions look inside the bowl. The next step is to add water. You don't want to add too much or too little. Too much will make it too water, too little and it will wind up too dry. I was actually worried that I put too much water in mine because I was dumb and held the bowl under the faucet before adjusting the force of water. Filtered water comes out of my faucet with a much greater force (since it's tunneled through a smaller exit). Lucky for me the proportion came out all right, though. Anywho, you mix it together until it comes out like a loose paste. No funny comments about what it looks like! :P


I set the temperature to the same setting I'd used for the alfredo because they are both equally as temperamental. I think my mom said she normally leaves it 4 and it's okay. I think it may have been safe for me to leave it at 4 also and the chicken and potato would have gotten a nicer brown coating, but I wasn't staying at the stove for the whole process so I went with the safer 3.5 setting.


Okay so first you make sure that your pot is heated long enough to get to the temperature you set it to. As my mom always says, "Hot pan, Cold Oil, Food won't stick." :) So, after the pot has had some time to heat up, then you add oil to cover the bottom. Pour your pastey mixture into the pan and swish(TM - just kidding lol) it around!

Now here is where the beauty of digital cameras comes into full play. Normally I couldn't tell you how long I let it cook for before adding the potato and chicken. But thanks to the magic of modern technology (*snort*), I can tell you exactly how many minutes passed between this swish-picture and the following "oops I started adding the ingredients and forgot to take a" picture. :) And that length of time is equal to: *drum roll* 7 minutes. This was approximately the length of time that I let the seasons cook in the pot (with me swishing it around for another 3-4 times). Yes I'm one of those impatient cooks that likes to stir stuff a lot while I stare and wait for it to cook. lmao If it were my mom she'd probably only stir it 2 times total and let it sit and cook and bubble on its own. haha

In this "oops I started adding the ingredients and forgot to take a" picture, I tried to demonstrate what state the seasonings were cooked to. It looks browner in this picture, but that may just be because I turned the stove light on and turned off the flash on the camera. Once I felt the seasons were cooked enough I started by adding the potatoes, then threw in the chicken.


Stir the pot so that your potato and chicken pieces all get a fair coating of the yummy delicious seasonings and then let it sit in the pot for 5 minutes.


After 5 minutes have passed, you can come in with the salt man! If you click on the picture above it should allow you to essentially zoom in to get a better view of how much salt coating I did. I tried to do a light sprinkle over the entire pot. In this session, I sprinkled, stirred, sprinkled one more time and stirred. If you sprinkle heavier, then I would say only do it once. Unless you really like salt, but y'know the doctors tell you it's not good for you. :P Water retention and what not - and it leads to high blood pressure .. or at the very least if you have high blood pressure then you'd better chill with the salt. lol

Ok so now you get the really important step that I didn't do when I first started cooking curry. Also the last time I made curry I didn't cover my pot. =/ Anyway this important step is known as "letting the curry spring water" or rather, letting the potato and chicken spring water. To be honest, I lowered the temperature to 3 at one point, but I can't remember at what stage I did it. I don't think it was this stage, but it may be midway through this stage... *sigh* stupid swiss cheese memory.


This is an example of the "spring"ed water. If you scroll up, you can see the difference between this and the dry pot prior to covering the pot. This picture was taken 42 minutes after the closed-pot picture. I actually let it cook (covered) for another 40 minutes or so after this (more or less an hour total). However, I did check on the pot approximately every 15 minutes to stir and try as much as possible to keep it from sticking to the bottom. If you're paying close attention, though, you'll know that I failed to keep it from sticking as I had broken some of the potato which got mixed into the curry. Although to be fair, I think a lot of that happened when I tried to dip the spoon into the middle to stir and wound up cutting a piece of potato in half.

On that note, a good way to tell when you're done with this water-springing, covered pot process is when first of all you have a considerable amount of natural liquid in the pot and secondly your chicken and potato pieces are fully cooked. In my case, I think I cooked my curry a tad too long since my potato was so easily squish-able. Man, I am all about the high tech cooking terms, right? :P Really once you've reached this stage, you are done. However some, like me, may prefer to have more ... serwa? surwa? I have no idea how to spell it. Some may call it "sauce" or "gravy" or "flavored water" lol. If you want the most condensed flavor, then you may end your curry cooking process here. If you want more liquid stuff, then you may continue as I did.

When the curry was done cooking, I heated up some water in the microwave. I added half a cup of water at a time. Ultimately for my curry I added 1 cup (1/2 cup, let it bubble up some and then 1/2 cup more). My mom said that was probably too much, but I did let it cook back down/boil up/down. This may also have led to my potatoes being so smushy (dude, I should just start my own cooking dictionary, right?). I'm 99% sure that this is a picture after adding the first 1/2 cup of water. And before adding the final 1/2 cup of water.

Here we ultimately have the finished product. This, ladies and gentlemen, is my finished pot of Guyanese Chicken Curry. This is after adding the 2nd 1/2 cup of water and letting it boil up for a bit (uncovered).

To serve, cook a pot of rice and plate it, then top with yummy delicious curry. :) My family and I eat it with a spoon, but Acturon seems to prefer eating his with a fork. The method of mixing differs from person to person as well. I think my parents mix it all together and then eat it and sometimes add dhal (a recipe perhaps for another day). I personally mix it with part of the rice at a time, cutting a piece of chicken and a piece of potato to have with each mouthful. :)

Note that you can also eat this with my personal preferred method, dhal puri. This is a type of roti with flavored ground peas inside of it. I've made it before with my mom, but never myself from scratch. That, also, would be a recipe for another day. If you live in New York you can always get your dhal puri pre-made from a restaurant called Sybil's. If you live here in Huntsville, you can go to Jordan Lane and get some from a restaurant called Curry-N-A-Hurry. Incidentally you can also just purchase chicken curry from them, but the chef there is Trinidadian and I personally feel that their curry tastes much different from ours (read - not as tasty :P). However, they kick my butt to Timbuktu and back with their dhal puri. I'd have to try extremely hard to make it as yummy as theirs. For those of you in New York, I can't remember having the curry from the, but since they are a Guyanese based location I imagine it would taste the same as ours. Sybil's also has a lot of other delicious stuff to sample.

Alright we're finally done here. lol I hope your attempts come out as good as this one did for me. And I hope even more so that this blog helps me to make mine equally as good in the future - without having to call my mom again!! :)

Saturday, August 21, 2010

Quick and Easy Linguine Alfredo

Before we begin, I have three disclaimers:

1) I am no expert of alfredo sauces. They come out yummy, but the texture is never quite creamy.
2) I do not claim that this is a healthy meal by any means. :P
3) This is a meal born entirely of leftovers.
To Elaborate:
Last Thursday was Acturon's birthday, so I made his favorite, lasagna (sorry, I didn't take photos ;[ ). The grocery store only had 15oz Ricotta (double what I needed). So I ventured to make stuffed shells with alfredo sauce using the leftover Ricotta (again, sorry no pix - by the time I remembered, I was already 1/3 of the way through cooking it). Used up the Ricotta, but now remained leftover half 'n' half. Finally, we also had half a box of linguine leftover from some time previous. So voila! We have Linguine Alfredo for dinner. lol

Now to begin:


Normal people probably use a saucepan to make their alfredo sauce. Even I used to be one of those normal people at one point, but I've found that using the frying pan helps me to better visibly eyeball how much Parmesan cheese goes into the sauce. . once upon a time I also used a recipe like the one below, which you may choose to do instead of trying to figure out what I did here.

1 stick butter, 1pt heavy cream, 2-3 cloves garlic, 1.5c -2c Parmesan, 1/4c fresh parsley (shyah right)

Once upon a time I actually kind of followed that recipe. Today the recipe was altered thusly:

1/2 stick butter, 1/2 pt Half n Half, ~1tbsp crushed garlic, ??? cheese, ?? dried parsley and ?? salt, black pepper and garlic powder. *snort*


I played around with various temperatures and finally settled on this medium-low-ish temperature. It's set to 3.5 in case the flash makes it impossible to see.


You begin with melting some butter. :) Feel free to use less, I even contemplated using less for this, but when I gave the Half 'n' Half a lil' shake, I found it was about half full so I stuck with this amount of butter.

I attempted to show the garlic in three stages. The first to demonstrate how much I used, the second to show that you swish it around the pan (lol very technical terms used here) and the final is supposed to show like what stage of browning I took it to. The cooking show people would say to cook it until your butter is infused with garlic. That is I think a fancy way of saying "when the pan smells strongly of garlic." lol Anyway, this is when I added the cream. :)

So, you add the Half and Half and swish it around (there's that expert term again :D) so that everything is sort of blended together... which isn't ultimately all that blended considering the butter is sort of floating on top still, but you get the picture... or got the picture? Pun? Maybe? Perhaps I should have also added a disclaimer of (warning, I think my weirdo sense of humor is funny when deep down I know people only laugh _at_ me and not _with me_.. :P) :)

After adding the cream (Half and Half in this case) I very lightly sprinkled some salt to enhance the flavor. Then, more liberally added some garlic powder in about the same pattern as what you see of the black pepper, which is of course way more visible than the salt and garlic powder. And then finally the black pepper was added where you can clearly see approximately how much I used. Is that an oxymoron? Clearly see .. approximate... >.> Hrm.. Maybe I should go to bed instead of staying up late posting blogs that are scheduled to be posted the next day at some arbitrary time...

These two pictures are supposed to represent how much cheese I added, but I highly doubt you can see what I did. And quite honestly, even if you could say, I would tell you to put less than what I did because the sauce ended up a bit more grainy than I would have preferred. Again, tasted delicious, but argh with the texture!! Anyway as a description of what I did, I generally try to sprinkle the cheese across the whole pan in a pattern akin to spreading mozzarella over a pizza pie. :)

Mix the cheese together and then add approximately that amount of parsley. :) Do I feel that parsley enhances the flavor of my alfredo? Hell no! I don't even know why it was in whatever original recipe I found/posted above. But it adds a nice color and makes the sauce pretty. And I don't know, maybe it does do something for the flavor, but I am generally of the opinion that parsley seems absolutely pointless to my taste-buds and is there solely to appeal to my visual senses.

This is what the sauce looks like after letting it cook for approximately ten minutes. Yeah I forgot to mention this entire meal was prepared in about the time it takes to boil some water and cook your pasta to al dente (~10mins in my case - cook times differ per pasta type). Doesn't it look pretty and tasty? :) No? Well go away then. (>.<) BTW- I will mention that this dinner is a remarkably fast process if it's so quick with _me_ doing it. Normally dinners take me at least an hour to prepare... >.> This one was maybe 20 minutes? So like normal people with pots and stoves that boil water faster and don't stop to take pictures between each step may even get this done in 15 minutes or less. Now how fast is THAT for making dinner?? Eat that 30 minute meal Rachel Ray. lmao

This is my half a box of linguine. I'm making the gross assumption here that I don't need to explain how to boil water and follow the instructions on your box of pasta. This isn't cooking level negative one - o - one. :P~~

To finish, mix your pasta into your sauce. Since I made linguine, I used a spaghetti spoon to mix it as this allowed me to pick up the pasta and move it around easier.

Alternatives:

Your favorite pasta such as the traditional fettuccine, or penne, medium shells, bowtie.. whatever you fancy.

Serve with garlic bread (sometime I'll show how I make my garlic bread ^_^)

Add delicious garlic-y chicken. When I'm lazy I add pre-cooked, diced frozen chicken (I think Tyson's makes the bag?) - just reheat in a separate frying pan and add to the sauce at the end. :) Or, you can chop up your own chicken and cook it with garlic --- or or or, you can do what the traditional restaurant type peoples do and GRILL your chicken! :)

Add broccoli, peas or whatever veggie you like.

Serve with Caesar salad..

I think you've grasped the idea by now. :) I will add as a note that with my recipe especially, and I believe even if you have "doggy bagged leftovers" from a restaurant, alfredo sauce never seems to reheat well. I usually end up with a mass of butter and some crumby cheese over pasta... ~_~ So on that note, I have the following tips:

1) If you know you are making more alfredo than what you intend to eat in one night:
DO NOT add your pasta to the sauce. Or at least do so in smaller quantities and in a separate container. Later, when you reheat your sauce (over the stove - NOT the microwave), add a little splash of milk and perhaps a sprinkling of other key ingredients such as garlic powder or Parmesan cheese. -- Just enough to rekindle the taste and texture of your sauce.

2) As you may have observed you can use either heavy cream or half 'n' half for your alfredo. However, I do not recommend using fat free half 'n' half. I tried it once before and all I got was a mass of stringy cheese. Feel free to try it and comment - maybe I had forgotten my recipe when I made it and forgot some key ingredient. But if you're not up for wasting your materials and efforts in the experiment of how I failed (lol) then I recommend avoiding it. :)

Hope your alfredo turns out as delicious as this one did! Ours is already all gone. :(