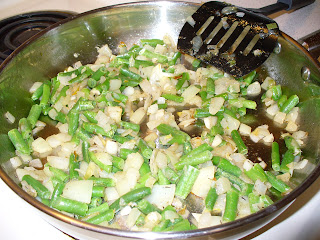
I called it Not Quite Grandma's because my grandmother uses mixed vegetables (carrots, peas..) instead of what I used - which is what I had in my freezer -- green beans. The ingredients are as follows: (no quantities, because I only
measure things when I'm reading the recipe from a book) Sorry! This isn't a cookbook :P
1lb lean ground beef
1 med-LG onion, chopped
a small handful of garlic cloves, chopped
a spoonful of (mine was frozen) chopped green onions
a spoonful of (same as above) shallots, chopped
some frozen cut green beans
thyme
garlic powder
black pepper
salt
oil
your favorite pre-made refrigerated pie crust
and I added a tiny pinch of sugar because when I tasted it, it lacked the sweetness of carrots and peas that my grandmother's mix would have had.
After that, I added the frozen green beans and cooked them until the "freeze" was gone.
I then added the ground beef and cooked until the meat was browned.
At this point, I let the meat mixture cool completely.
Following the instructions for a 2-crust pie on my box of pre-made pie crust, I placed the first crust snugly into the pan and cut off the excess from the edge. Then, I dumped the meat mixture into the crust-lined pan. :)
Topping the pie with the second crust, you (as they tell you to) tuck the top part under the bottom crust. They don't tell you this, but from past experiences of leaking pies, I made sure to smoosh the top crust into the bottom of the bottom crust to create a nice seal. Then, I "fluted" the edges (basically just stick your finger around and smoosh the crust around your finger). I admit, this is actually one of my best flute-jobs. Then, with a butter knife, I sliced the top to allow room for steam to escape, as instructed.
Once again, as instructed, I allowed the pie to bake for 20 minutes (baking temperature was 350°F) and pulled it back out so that I could do a frustrating attempt at covering the edges with foil. This has got to be the worst stage of pie-baking in my opinion because the balancing act with the foil pieces is always pure torture for me. I believe they actually sell foil that is pre-made to shape around pie crusts now, but I either never saw it, never remember to buy it, or didn't want to spend the money on it. That may change soon. >.>
I forgot to take a picture before putting it back in the oven, but I'd have been darned if I was going to move this sucker again just for a picture. So you now have the "in the oven" view. :)
Here is the finished product, after an additional 20-25 minutes of baking. Nice golden brown color - and at this length of cooking, the crust was flaky and not mushy. I think using the lean ground beef also helped to make the meat mixture fairly dry, so no noticeable soaking occurred at the bottom crust.


Hi Cathy,
ReplyDeleteThat actually looks delish! I will have to show this to your grandma, she'll like it.
mom
I'm going to have to give this a try... Seems easy enough...
ReplyDeleteIt really is, and yummy! :)
ReplyDeleteVery delicious pie. nomnomnom
ReplyDelete